I’m all over Scouting this year. I’m my 5 year old DD’s Daisy leader, my 7 year old DD’s co-leader/cookie mom and my 9 year old son’s assistant (to DH) den leader and pack treasurer. Since I spend every Monday and Tuesday coming up with projects for some type of scout or another, I thought I’d share one of my projects each week. Coincidentally, our meetings are also every Monday and Tuesday (the girls alternate Mondays, the boy is every week). I don’t think I could do it if I couldn’t procrastinate.
This week is our service unit’s cookie kickoff – which means it’s Cookie Time! Girls from all over our county will be at a party to start the cookie selling season. I thought it would be nice for my Daisies to have a troop shirt to wear to the party. The Brownies might actually do a version of this shirt later.
This project can easily be transformed for any use. My 7 year old's preschool did a similar project for Earth Day - they took white shirts and drew circles to represent the Earth in the middle and gave the kids blue and green paint.
Preparation:
I bought a pack of t-shirts in a size I thought would fit all my girls (all three of them). It actually is probably a little small for one of them, but as her mom pointed out, the next size up would be enormous. I picked out plain, old acrylic paints from my craft stash in each of the colors of the Daisy petals. I had to buy a few to fill in, but I had most of them from a project my older DD’s troop did as Daisies.
I also grabbed some old t-shirts for smocks to keep their clothes clean. I used a combo of paper plates and old plastic lids for paint palettes.
Step one: The Design
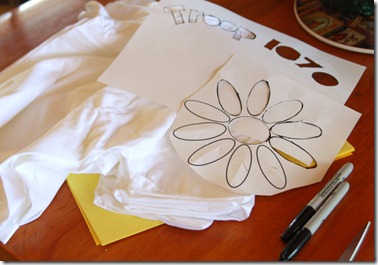
I printed out the Daisy petals from ScoutingWeb (scroll down a bit). Then I cut out the petals (I figured out that if you only cut out half, you could flip it to do the rest – saved my hands from cutting so many tiny petals – yay for the lazy way!). If my printer wouldn’t freaking jam every time I try to print on cardstock, I would have done this on nice heavy paper.
Then I went into Word and played around with WordArt to get a curve and found a font that was nice and thick, but still fun. I cut out the letters the first time and destroyed the outside. You can certainly trace around each letter, but then you have line them up and I’m lazy. So I reprinted and cut out the insides and made sure the surrounding paper stayed intact. It was much easier to trace the inside of the paper.
Step Two: Preparing the Shirts

I took a sheet of cardstock and put it inside each shirt, so my Sharpie wouldn’t bleed through. I left it there when I was done tracing so it would be ready for the girls to paint later.
Step Three: The Meeting
At our meeting I set up drop cloth on the tables we use. We have a very nice church that allows us to meet, so I don’t want to mess up their space. I put out one color for the first girl, she filled in the right petal (actually some were wrong, but that’s because I got my book out to check if I had all the colors I needed and left it on my table – I’m good like that) and passed her paint on to the next girl. We continued until they were all painted in. Then I let them fill in our troop number with whatever colors they wanted.
This is my DD’s. I think it’s adorable. The messy petals and letters give it a charm that can only be achieved by little fingers.

Final Cost:
I only have three girls, but this is still an inexpensive project – or at any rate, much less than having troop shirts printed somewhere.
I bought:
- A pack of 5 undershirts - $6.67.
- Four packs of 4 sponge brushes - $4.00
- Dropcloth - $3.50
- Paints - $3.00 (I had the rest on hand or mixed them at the meeting – this could cost more if you don’t own any paints)
So for under $20, we had troop t-shirts. And the cost wouldn’t have gone up if we’d had two more girls. So $4/girl. A little more than I like to spend on a regular meeting, but for troop t-shirts, a fair price.


